If you’re encountering the SUPR3HardenedWinReSpawn error in VirtualBox, you’re not alone. This error typically occurs due to security or compatibility conflicts between VirtualBox and your host operating system. It can be caused by antivirus interference, Hyper-V conflicts, or corrupted installations.
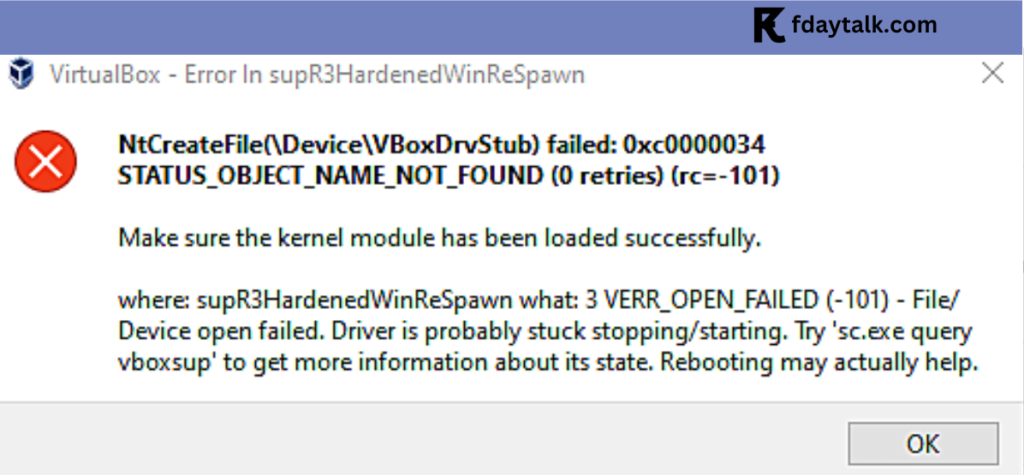
VirtualBox – Error In supR3HardenedWinReSpawn
NtCreateFile(\Device\VBoxDrvStub) failed: 0xc0000034
STATUS_OBJECT_NAME_NOT_FOUND (0 retries) (rc=-101)Make sure the kernel module has been loaded successfully.
Common Causes of the Error
- Antivirus Software Interference: Security software often blocks VirtualBox from functioning correctly.
- Conflicts with Hyper-V: If Hyper-V is enabled on your Windows system, it can interfere with VirtualBox.
- Corrupted Installation: A partial or faulty installation of VirtualBox can trigger this error.
- Driver Signature Enforcement: VirtualBox requires signed drivers, and conflicts can arise if these are missing or blocked.
- Windows Updates: Certain updates or patches might disrupt VirtualBox’s hardened security model.
Step-by-Step Solutions
1. Temporarily Disable Antivirus Software
Some antivirus programs block VirtualBox. Disabling the antivirus or adding VirtualBox to its exception list can solve the issue.

Steps to Whitelist VirtualBox in Avast (Example):
- Open Avast Antivirus.
- Navigate to Menu > Settings > Exceptions.
- Add the VirtualBox installation folder (e.g.,
C:\Program Files\Oracle\VirtualBox).
Re-enable your antivirus after testing.
2. Disable Hyper-V
Hyper-V, Microsoft’s built-in virtualization feature, often conflicts with VirtualBox.
To Disable Hyper-V:
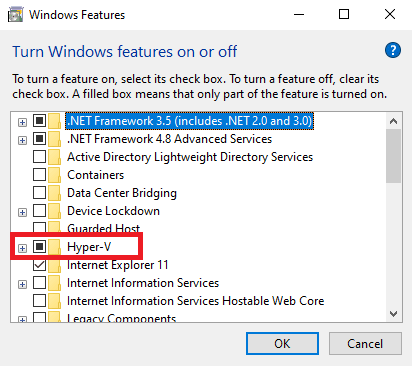
- Press
Win + R, typeoptionalfeatures.exe, and press Enter. - Uncheck Hyper-V and click OK.
- Restart your system.
Alternatively, use the Command Prompt:
bcdedit /set hypervisorlaunchtype offReboot your computer after executing this command.
3. Completely Uninstall and Reinstall VirtualBox
A thorough reinstallation process can resolve issues related to corrupted installations or conflicts caused by leftover files.
Steps:
- Uninstall VirtualBox from your system.
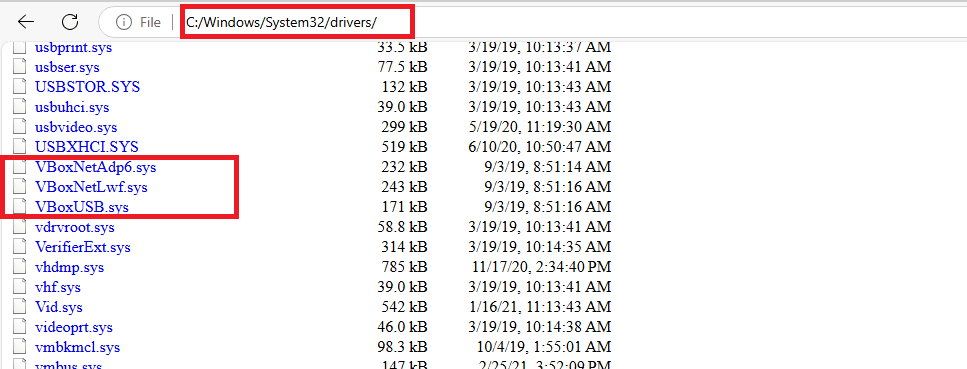
- Navigate to
C:\Windows\System32\driversand delete any files starting withVBox(e.g.,VBoxDrv.sys,VBoxNetAdp.sys).
- Restart your computer.
- Temporarily disable any third-party antivirus or security software.
- Re-download the latest version of VirtualBox from the official website.
- Right-click on the installer and select Run as Administrator.
- Follow the installation instructions.
- Restart your computer after installation.
4. Enable Virtualization in BIOS
Ensure that hardware virtualization is enabled on your system.
Steps:
- Restart your computer and enter the BIOS/UEFI settings (typically by pressing
F2,F10, orDELduring boot). - Look for Intel Virtualization Technology or AMD-V and enable it.
- Save changes and exit the BIOS.
5. Reinstall the VBoxDRV Driver
The VBoxDRV driver is critical for VirtualBox’s operation. If it’s not installed properly, the error may occur.
Steps:
- Navigate to
C:\Program Files\Oracle\VirtualBox\drivers\vboxdrv. - Right-click on
VBoxDrv.infand select Install. - Restart your computer and try running VirtualBox again.
6. Discard Saved VM State
If the error occurred while resuming a saved state, discarding the saved state can help.
Steps:
- Open VirtualBox.
- Right-click on the affected VM and select Discard Saved State.
- Start the VM again.
7. Check Registry Entries
Inconsistent registry settings can also lead to this error.
Steps:
- Press
Win + R, typeregedit, and press Enter.
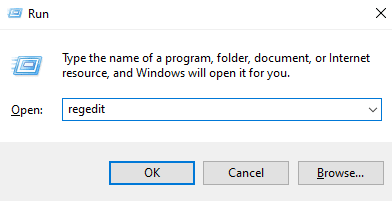
- Navigate to
HKEY_LOCAL_MACHINE\SYSTEM\CurrentControlSet\Services\VBoxSup. - Find the
Startkey, double-click it, and set its value to3(manual start). - Close the Registry Editor and restart your computer.
8. Adjust VirtualBox VM Settings
Tweaking VM settings can sometimes resolve the issue.
Steps:
- Open VirtualBox.
- Right-click on the VM and go to Settings.
- Navigate to System > Acceleration and set Paravirtualization Interface to None.
- Disable hardware virtualization temporarily.
- Save and try starting the VM again.
9. Repair Microsoft Visual C++ Redistributables
VirtualBox depends on Visual C++ Redistributables. Ensure they are installed or repaired.
Steps:
- Download the latest supported versions from Microsoft’s website.
- Install or repair both x86 and x64 versions.
10. Reinstall VirtualBox Drivers
Remove and reinstall VirtualBox drivers if the problem persists.
Steps:
- Navigate to
C:\Windows\System32\drivers. - Delete any files starting with
VBox(e.g.,VBoxDrv.sys). - Reinstall VirtualBox as described earlier.
Conclusion
By following these steps, you should be able to resolve the SUPR3HardenedWinReSpawn error in VirtualBox. If the issue persists, consider seeking help from the VirtualBox forums or using an alternative virtualization tool like VMware.
Let us know in the comments which solution worked for you!